Fiori, iOS, SAP Cloud Platform, Mobile Services, Offline App
Introduction
Welcome to part 4 of the blog series exploring the SAP Cloud Platform SDK for iOS assistant. In this blog we will build a native Fiori CRM application. Previously, we have touched on:
- Introduction to SAP Cloud Platform SDK for iOS
- 1: Meet the new SAP Cloud Platform SDK for iOS Assistant
- 2: Configure SAP Cloud Platform (SCP) mobile services
- 3: First SAP Cloud Platform SDK for iOS Application using EPM demo service
Sales executives are always in the field using their gadgets and engaged in the lead generation process. Often, they would like to have the information about their contacts and leads and would like to know the correspondence history or action items pending on a given lead.
Goal in this blog
To build the below application using Custom Fiori iOS Controls
Let’s play with code
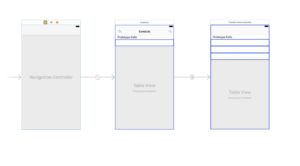
Create the following story board using
- Navigation Controller
- TableView Controller
- View Controller with table view – This is for Part 5 of the blog series

Attach the ViewController file to tableView controller

Perform the following steps to achieve the above application:
- For the table view controller use the implement the following methods
func numberOfSections(in tableView: UITableView) -> Int {}
func tableView(_ tableView: UITableView, numberOfRowsInSection section: Int) -> Int {}
func tableView(_ tableView: UITableView, titleForHeaderInSection section: Int) -> String? {
func tableView(_ tableView: UITableView, cellForRowAt indexPath: IndexPath) -> UITableViewCell {}
2. Attach a Profile button using left navigation bar
private func initialProfile(){
let button = UIButton(type: UIButtonType.custom)
button.setImage(UIImage(named: “NaveenProfile”), for: UIControlState.normal)
button.frame = CGRect(x:0,y:0,width:40,height:40)
button.addTarget(self, action: #selector(viewProfile), for: UIControlEvents.touchUpInside)
let barButton = UIBarButtonItem(customView: button)
// Adding action to profile
// barButton.target = self
// barButton.action = #selector(viewProfile)
self.navigationItem.leftBarButtonItem = barButton
}
3. Create your data sources and implement the Contact Cell – Fiori Custom controller
let contactCell = tableView.dequeueReusableCell(withIdentifier: ContactCell.reuseIdentifier, for: indexPath) as? ContactCell
let activities: [ActivityItem] = [ActivityItem.phone, ActivityItem.message]
let contact = newLeadsname[indexPath.row]
contactCell?.detailImage = newLeadsImage[indexPath.row]
contactCell?.headlineText = contact
contactCell?.subheadlineText = newLeadsTitle[indexPath.row]
contactCell?.descriptionText = “800 N Washington Avenue”
contactCell?.activityControl.addActivities(activities)
contactCell?.mainStackWidth = 0.5
Up Next: Fiori CRM – iOS Application with Activity History
AUTHOR
Naveen Rokkam currently leads the Innovation Practice at Mindset. He is responsible for Product Development, research, and Innovation at Mindset. Also, he is a technology evangelist and SAP Practioner with more than a decade of experience in developing and implementing new Software Products using SAP. Additionally, he was part of the Technology Innovation Platform group in SAP Labs and contributed toward the development of Netweaver 8.0, Process Integration, and Business ByDesign. Further, his research interests span across Internet-of-Things, Machine Learning, Big Data, and Mobile App development.
SOURCE CODE
Get started on your SAP Cloud Platform SDK for the iOS experience. Click here to request the full project code.
If you have an interest in viewing similar content, visit our blog, here.
View our LinkedIn, here.