In the previous two parts of this blog series, we discussed the different languages and notations in the Core Data Services (CDS) (An Introduction to CDS in the SAP CAPM; and Decoding CDS Query Language). In part three, we will look at how to create a simple CAPM project, implement custom functions in Cloud Application Programming Model and invoke the functions in the local host.
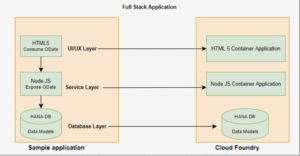
The basic flow of an SAP CAPM Project: The CAPM Project is a Full-Stack application

A CAPM project is a Multi-Target application because it runs at different run times. For example, the persistence layer runs in the HANA DB run time, the service layer runs in the Node.js run time and The UX/UI layer runs in the Browser run time.
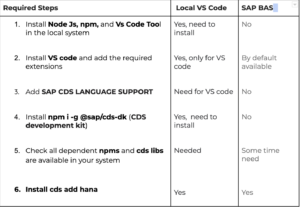
Step 1: Prerequisites for a CAPM project
Step 2: Creating a small demo CAPM Project.
Go to your project folder location in VS code/BAS terminal and execute the command in terminal “cds init <ProjectName>” (cds init customer)
(or)
In SAP BAS we can create the CAPM project through the Template option.
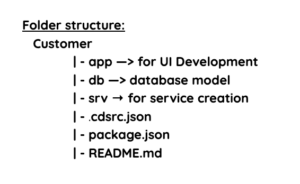
After executing the above command the project is created in your selected location like the below structure.
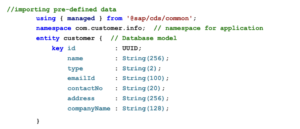
- Create a DB file with “.cds” extension in the db folder for DB model (entities), like below .
Ex: data-models.cds in db folder
- Create a Service file with “.cds” extension in the srv folder for service calls, like below .
Ex: custservice.cds in srv folder.

- Execute npm install command in the project terminal.
- Run the application using “cds run (or) cds watch” in the project terminal.
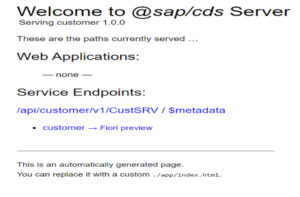
You should now be able to see the below screen
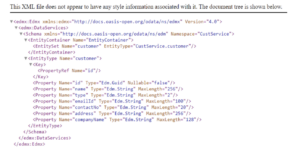
Metadata result:
V4 Results:

- Create a .csv file for the temp data: Add the .csv file with dummy data like below;
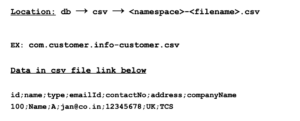
- Run again will get result like below
V4 Results:
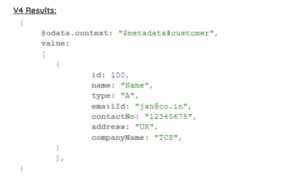
The Function implementation in a SAP CAPM Project
Now we will be implementing custom functions in the Cloud Application Programming Model and invoking the functions in localhost.
Note: The custom functions are used to do additional activities in CRUD operations.
- Within service definitions, you can additionally specify actions and functions.
- In SAP CAP, we have two types of functions (Bound Functions and Unbound Functions)
- We Need to Create One “.JS” file with the same name as the “.cds” in the srv folder in order to implement the custom logic.
Bound Functions
The Actions and functions can also be bound to individual entities of a service, enclosed in an additional actions block.
Implementation:
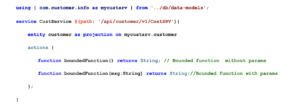
Note: Multi params Example
function boundedFunction(msg:String, data:String) returns String;
In the above example, we have defined the Bound function in the .cds file which is bound to the individual entity customer.
Now, implementing custom logic to Bounded functions. (The next most important step is creating a function definition in the .js file.)
The file location is: srv→ custservice.js
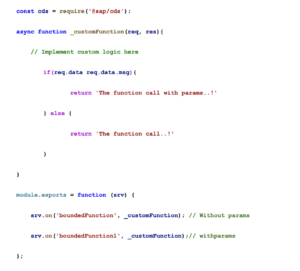
Run URL:
//Without params
https://port4004-workspaces-ws-t4fcs.us10.applicationstudio.cloud.sap/api/customer/v1/CustSRV/customer/100/CustService.boundedFunction()
//With params
https://port4004-workspaces-ws-t4fcs.us10.applicationstudio.cloud.sap/api/customer/v1/CustSRV/customer/100/CustService.boundedFunction(mag=”)
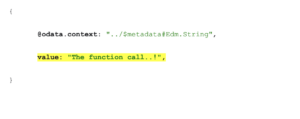
Result Data:
Unbound Functions
The notion of actions and functions in CDS is adopted at the service level. Here no involvement of entities.
Implementation:
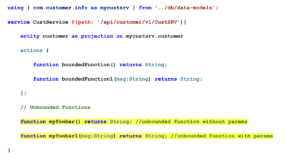
Lets implement custom logic in custservice.js

Run URL:
// Without params
https://port4004-workspaces-ws-t4fcs.us10.applicationstudio.cloud.sap/api/customer/v1/CustSRV/myfoobar()
// With params
https://port4004-workspaces-ws-t4fcs.us10.applicationstudio.cloud.sap/api/customer/v1/CustSRV/myfoobar(mag=”)
Result:

Note: From the CDS perspective, I recommend preferring unbound actions/functions. This is because these are far more straightforward to implement and invoke. Because you now know how to create custom functions and implement the custom functions in SAP CAPM, you will have no problem using the function concept and implementing custom logic in your code.