I’ll gladly admit: I was really excited when the announcement came last week that Google Docs and Sheets would be open to third-party add-ons developed in Google Apps Script. It opens the door to all sorts of interesting application integration capabilities, and enhances them with the collaboration tools and ubiquity of Google Drive.
The software developer in me immediately thought “I’ll bet I can plug that into Gateway!” The power of SAP NetWeaver Gateway to take anything in a Business Suite system and expose it for consumption through OData REST services means that a wide variety of consumers can make use of this data – and Docs and Sheets are no exception. There’s a built-in API for communicating with other internet services, powerful XML parsing, and even support for an html-based UI paradigm.
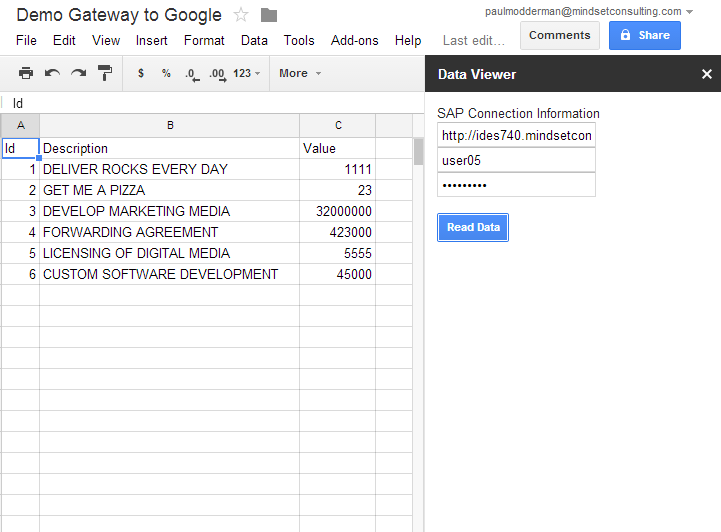
So here’s how I created a simple add-on to read and display data from a Gateway service in a Google Sheets document. When it’s all finished and pulling data, it should look something like this (including the sample data I pulled from my service):
Prerequisites:
- A Google account, so you can create documents on your Drive.
- A Gateway service that returns some sort of useful entity data. I created a simple service that just spits out contrived data for contracts that I stored in a z-table on the SAP side – but this could be any service you want.
- Basic knowledge of javascript. Really not much expertise needed – it doesn’t take much code to hook up this minimalist tool.
Set up the Apps Script Project:
- Create a spreadsheet anywhere in your Drive:
- Sign in at docs.google.com
- Click the “Create” button on the left side
- Choose “Spreadsheet”
- Create an Apps Script project:
- Open the new spreadsheet
- Click the “Tools” menu
- Choose “Script Editor…”
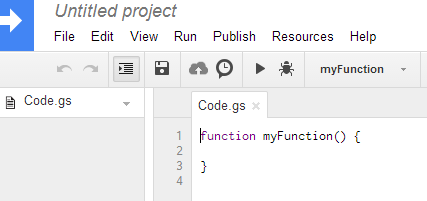
- On the wizard that appears, choose “Blank Project”
 You can name the project anything you like. When the project is complete and running in your spreadsheet, the name of the project will be the first layer of the add-on menu to navigate to this functionality.
Build Your Code:
 function onInstall() {
  onOpen();
 }

 function onOpen() {
  SpreadsheetApp.getUi().createAddonMenu()
   .addItem('Retrieve SAP Data', 'showSidebar')
   .addToUi();
 }

 function showSidebar() {
  var ui = HtmlService.createHtmlOutputFromFile('Sidebar')
        .setTitle('Data Viewer');

  SpreadsheetApp.getUi().showSidebar(ui);

 }
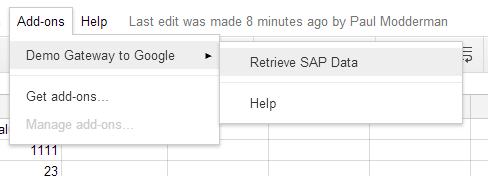
This code is adding the menu under the “Add-ons” menu that appears on the spreadsheet. It enables you to have the menu structure you wish for your application. In the next step we’ll create the html file necessary to render a sidebar menu.
Why is there an onInstall() and an onOpen(), and onInstall() just calls onOpen()? It has to do with how installations work in Apps Script. When you install an add-on, your document is already open and thus does not trigger the onOpen() event. The onOpen() method is added to onInstall() so that when the script is installed, it also performs the menu setup and other tasks that would normally occur when the document opens.
The addItem() call is registering the function showSidebar() to be triggered when you click on “Retrieve SAP Data”. This is how we’re going to open the sidebar menu that we create.
Here’s what mine looks like:
Next, create an html file in your project. In the menus follow File…New…Html file, and name your html file “Sidebar”. Put the following code in:
 <link rel="stylesheet" href="https://ssl.gstatic.com/docs/script/css/add-ons.css">
 <!-- The CSS package above applies Google styling to buttons and other elements. -->

 <div class="sidebar branding-below">
  <form>
   <div class="block" id="credentials">
    SAP Connection Information<br>
    <input type="text" id="serviceaddress" placeholder="Service Address"><br>
    <input type="text" id="userid" placeholder="User ID"><br>
    <input type="password" id="password" placeholder="Password">
   </div>
   <div class="block" id="button-bar">
    <button class="blue" id="read-data">Read Data</button>
   </div>
  </form>
 </div>

 <script src="//ajax.googleapis.com/ajax/libs/jquery/1.9.1/jquery.min.js">
 </script>
 <script>

  $(function() {
   $('#read-data').click(readData);
  });

  function readData() {

   var token = $('#userid').val() + ':' + $('#password').val();
   var serviceaddress = $('#serviceaddress').val();

   //Call out to the Code.gs script function readContracts
   google.script.run
    .readData(token, serviceaddress);

  }

 </script>
Here we’ve defined a simple user interface that has four components: an input that accepts a URI for the Gateway service you want to read, an input that accepts an SAP user name, an input that accepts an SAP password, and a button that triggers the read activity. We’ve also used the included jQuery to register an event on the button so that when you click “Read Data” you’ll call out to the appropriate function to read the data you’ve chosen. The nice thing about the html files used for the sidebar is that they can be customized with javascript/css/html like any other part of the web, so they can be very flexible and built to suit a lot of different needs.
Next, go back to the Code.gs file, and insert the below code after the showSidebar() function.
 function readData(authinfo, serviceaddress) {

  //Clean up anything currently on the spreadsheet
  SpreadsheetApp.getActiveSheet().clear();

  try {
   var options = {
    headers: {
     'Authorization': 'Basic ' + Utilities.base64Encode(authinfo)
    },
   };

   //UrlFetchApp is a powerful built-in library from Google
   var response = UrlFetchApp.fetch(serviceaddress, options);

   //Various XML parsing.
   var xml = response.getContentText();
   var document = XmlService.parse(xml);
   var root = document.getRootElement();
   var atom = XmlService.getNamespace('https://www.w3.org/2005/Atom');
   var entries = document.getRootElement().getChildren('entry', atom);

   //This loop handles the writing of the response data
   //to the spreadsheet.
   var row = 1;
   for (var i = 0; i < entries.length; i++) {
    //Navigate the xml response document to get properties/values
    var content = entries[i].getChildren('content', atom);
    var properties = content[0].getChildren();
    var values = properties[0].getChildren();

    //First pass through the outer loop we will use to also write
    //the header row, using the properties as column headers.
    if (i == 0) {
     var headercolumn = 0;
     for (var j = 0; j < values.length; j++) {
      headercolumn++;
      SpreadsheetApp
       .getActiveSheet()
       .getRange(1, headercolumn)
       .setValue(values[j].getName());
     }
    }

    //Now write the values of the properties
    row++;
    var column = 1;
    for (var j = 0; j < values.length; j++) {
     SpreadsheetApp
      .getActiveSheet()
      .getRange(row, column)
      .setValue(values[j].getText());

     column++;
    }
   }
  }
  catch(err) {
   //Write any retrieve or parse errors into A1 of the main sheet
   SpreadsheetApp
    .getActiveSheet()
    .getRange('A1')
    .setValue(err.message);
  }

 }
This function is the meat and potatoes of this demo. We’re handling basic authorization, the http request and retrieve of service data, and parsing/writing that information into the document. If I was writing this code for a professional application you can bet I’d be following a few more Code Complete conventions.
(You can see that in this demo we use basic authentication: taking the user ID and password from the sidebar, using the Google provided Utilities.base64Encode(), and passing that into the header of the request. To turbocharge your security/single sign-on, Google also provides some built-in OAuth handling you can check out in the documentation.)
UrlFetchApp is another powerful built-in tool in Apps Script. This lets you handle the http/https requests and get the responses. In this case, to get at the xml that Gateway is handing back to us, we use the HTTPResponse method getContentText(). It’s not built into a full document model yet, so we use yet another built-in tool to create and parse the xml: XmlService. Any of the response, document, entry, or properties variables in this code are based on parsing that xml.
The <entry> node holds a single data record of the response, which is why we base the outer for loop on the number of <entry> nodes. On the first pass through the loop we also examine the properties of the data. This is so that we can write out a header line for the data. After that, it’s just a matter of popping the data into cells of the spreadsheet.
That’s basically it! We now have a small script that can pull out data from a Gateway service. This is very very basic stuff. Further, if you want to do anything interesting, you’ll obviously have a lot more work in front of you. Nevertheless, I hope this is food for thought!
If you are interested in viewing similar articles, visit our blog, here.
View our LinkedIn, here.

